2022. 4. 14. 17:38ㆍ[DB]/[MongoDB]_DB
목표]
순수 java로 Mongodb 에 연결하여 데이터를 읽고, 쓰기
Tool : Intellij
DB : MongoDB
빌더 : Maven
Intellij로 Maven 프로젝트를 하나 만듭니다]

2. Pom.xml 에 Dependency 추가
<dependency>
    <groupId>org.mongodb</groupId>
    <artifactId>mongo-java-driver</artifactId>
    <version>3.4.1</version>
</dependency>
3. 자바 파일 2개 생성

4. Mongodb 에는 연결을 하고 Collection 객체를 반환하게 만들었습니다.
ublic class Mongodb {


    public DBCollection collection;
    // 콜렉션 객체 반환
    public DBCollection selectMongo(){
        return collection;

    }

    public Mongodb() {
        //생성자 호출과 동시에 연결
        //접속정보
        String MongoDB_IP = "localhost";
        int MongoDB_PORT = 27017;
        String DB_NAME = "admin";
        String Databasename = "inventory";
        String user = "debezium";
        char[] pw = {'d','b','z'};

        MongoCredential credential = MongoCredential.createCredential(user,DB_NAME,pw);
        //connect to db
        MongoClient mongoClient = new MongoClient(new ServerAddress(MongoDB_IP,MongoDB_PORT), Arrays.asList(credential));

        List<String> database = mongoClient.getDatabaseNames();
        System.out.println("=====Database List===== ");
        int num =1 ;
        for (String dbName : database) {
            System.out.println( num  + ". " + dbName);
            num++;
        }

        DB db = mongoClient.getDB("inventory");
        Set<String> collections = db.getCollectionNames();

        System.out.println("Database : " + Databasename);
        for (String colName : collections) {
            System.out.println(" + Collection: " + colName);
        }

        DBCollection collection = db.getCollection("book");
        this.collection = collection;
        }
        }
접속정보 부분]
//접속정보
String MongoDB_IP = "localhost";
int MongoDB_PORT = 27017;
String DB_NAME = "admin";
String Databasename = "inventory";
String user = "debezium";
char[] pw = {'d','b','z'};
MongoDB_IP -> mongodb 의 IP주소
MongoDB_PORT -> mogodb를 연 포트 번호
DB_NAME -> user가 위치한 db이름
Databasename -> DB 의 이름
String user -> 접속할 유저 아이디
char[] pw -> 접속할 유저 비밀번호
접속 설명]
MongoCredential credential = MongoCredential.createCredential(user,DB_NAME,pw);
//connect to db
MongoClient mongoClient = new MongoClient(new ServerAddress(MongoDB_IP,MongoDB_PORT), Arrays.asList(credential));
MongoCredential 을 통해서 해당 유저가 어느 디비에 무슨 유저인지 확인합니다
-> 별도로 지정 안하면 빼도 됩니다.
MongoClient 에서 서버 주소와 포트를 넣고
위에서 유저정보를 불러온 값을 이용해서 MongoClient 를 생성합니다.
MongoDB의 Database들 확인]
List<String> database = mongoClient.getDatabaseNames();
System.out.println("=====Database List===== ");
        int num =1 ;
        for (String dbName : database) {
            System.out.println( num  + ". " + dbName);
            num++;
        }
DB의 이름을 불러옵니다.
실행화면]

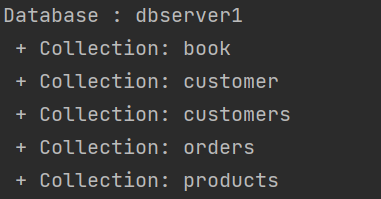
DB 접근]
DB db = mongoClient.getDB("inventory");
Set<String> collections = db.getCollectionNames();

System.out.println("Database : " + Databasename);
        for (String colName : collections) {
            System.out.println(" + Collection: " + colName);
        }
MongoDB 는
database -> Collection -> Document -> Fields 구조입니다.
db 에 Inventory 라는 데이터베이스 이름을 찾고
그 안의 콜렉션을 출력합니다
실행화면]

콜렉션 접근]
DBCollection collection = db.getCollection("book");
this.collection = collection;
이제 Database 에서 안에 있는 book 이라는 콜렉션에 접근합니다.
그리고 이를 반환합니다.
DB를 일정 주기별로 데이터 삽입 소스 코드]
public class KafkaMongoDBInsert {
    public static void main(String[] args) {


        Timer jobScheduler = new Timer();

        TimerTask task = new TimerTask() {

            Integer count = 0;
            Mongodb mongo = new Mongodb();

            @Override
            public void run() {
                String date = NowTimer();
                String rand = RandomString();

                count++;

                Map<String, Object> documentMap = new HashMap<String, Object>();
                documentMap.put("id", count);
                documentMap.put("time", date);
                documentMap.put("data", rand);

                DBCollection collection = mongo.selectMongo();
                collection.insert(new BasicDBObject(documentMap));

                System.out.println("collection = " + documentMap);


            }
        };

        jobScheduler.scheduleAtFixedRate(task, 1000, 3000);


    }

    public static String NowTimer() {

        Date date = new Date();

        SimpleDateFormat sdf1 = new SimpleDateFormat("yyyy-MM-dd HH:mm:ss");
        String nowTime1 = sdf1.format(date);

        return nowTime1;
    }

    public static String RandomString() {

        String[] items = {"testdata1", "testdata2", "testdata3", "testdata4"};
        Random rand = new Random();
        String result = items[rand.nextInt(4)];


        return result;
    }
핵심 기능]
Map<String, Object> documentMap = new HashMap<String, Object>();
documentMap.put("id", count);
documentMap.put("time", date);
documentMap.put("data", rand);

//Insert Data03

DBCollection collection = mongo.selectMongo();
collection.insert(new BasicDBObject(documentMap));
아까 리턴받은 값이 mongo 입니다.
그전에 key와 value가 나누어진 map객체를 만들고
이를 각각 값을 집어넣습니다.
DBcollection을 이용해서 해당 콜렉션을 선택하고
여기에 insert 함수를 이용해서 값을 변환하여 넣어줍니다.
결과화면 ]

감사합니다.
'[DB] > [MongoDB]_DB' 카테고리의 다른 글
| [MongoDB]_Springboot 에 mongoDB연결 및 데이터 입력(_insert) (0) | 2022.04.17 |
|---|